Zonify
 left click
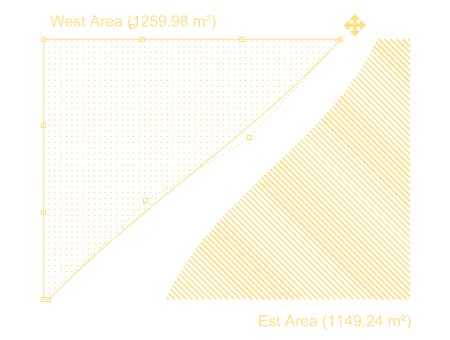
The zonify command creates a surface entity that displays the information (name and square meter) of an area in the model.
Insert a zone
Steps:
- Run the laZonify command. Select one of the two options in the command line to insert the Zone object:
- Pick inner point: click inside a closed boundary of 2D curves.
- Boundary curve: select a closed and planar curve.
- After the first step, the Zonify insert dialog box will appear. This dialog shows the basic options of the Zone object in two tabs: Choose the basic insert options. Press ENTER, ESC or right click to exit the dialog.
- Pick a point to insert the Zone label.
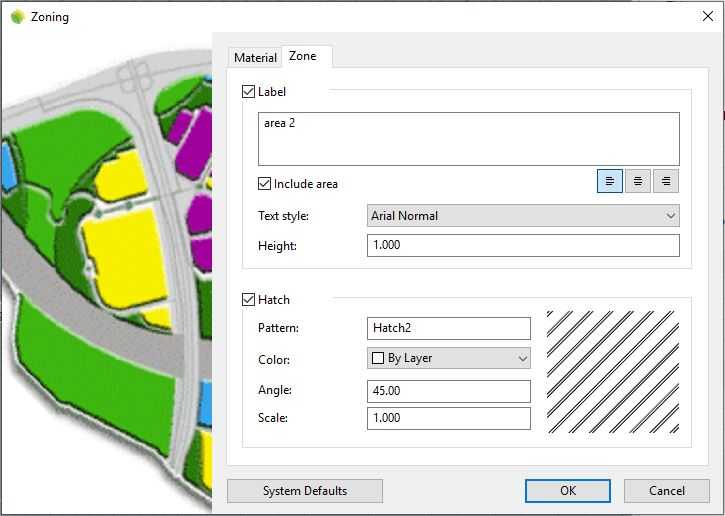
Insert dialog box for the Zonify object
A zone can be also created when adding a division on a terrain, which is generated with the following commands:
Control points 
The Zone object has the same control points as the curves used to generate it.
In addition, it has a Control arrow to move the Zone surface and a Control arrow to move the zone Label.
To turn a Zone object control point on run the PointsOn command (or press F10) and select the Zone object. To turn its points off, press the Esc button or run the PointsOff command.
Control points on a zone
Insert options and parameters
The Zone object insert options and parameters are divided in different tabs, and are available from different dialogs:
- Zonify insert dialog box (only available when inserting new Zone).
- Zone properties section, in the Lands Design Edit panel.
- Object Properties dialog.
- Properties Explorer dialog.
General
General attributes for the Zone object: Name, Color, Layer, and Transparency (only visible in Conceptual display mode).
Zone
- Label: displays the text and area of the zone. Use the checkbox to hide or show it.
- Label box: multiline text box to type the text to display in the label.
- Include area: option to display the square meter in the label.
- Text style.
- Height: text size.
- Hatch attributes:
- Pattern
- Color
- Angle
- Scale
Material
This tab lets you change the textured image assigned to this element and define the image size and reflectivity.
Edit options
These are the edit options for the Zone object, available in the Edit area of the Edit panel:
 Update
 Convert to 2D. Displays the object in 2D display.
 Convert to 3D. Displays the object in 3D display.
- Show 2D and 3D: Turns the object 2D and 3D representation on simultaneously.
- Copy properties from another object
- Adjust
- Don't adjust to terrain
Zone graphical display
The Zone object is represented as a hatch pattern in 2D display and as a textured surface in 3D display. The zone text label is displayed in the same way in both display modes.