Image Filter Application
The Image Filter aplication is a built-in editor that lets you apply multiple filters to the rendered images, view captures or any other image file.
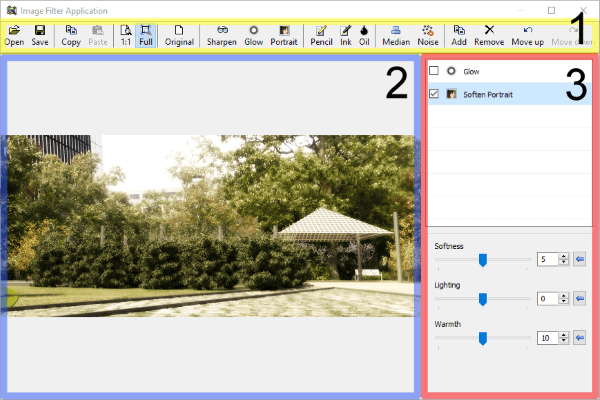
After running the laImageFilters command, the Image Filter dialog will appear. This dialog is organized in three areas:

Image Filter dialog
1. Toolbar line
File commands
- Open
- Save
- Copy
- Paste
Image preview commands
- 1:1: zooms the image preview so that the image is shown in 1 to 1 scale.
- Full: zooms the viewport so that the image is shown in full scale.
- Original: shows the image as it was before applying any effect.
Effects
The effect buttons change the aspect of the picture according to different parameters. Click on the desired effect to add it in the Edit area. Add more effects by clicking on the Add button, and choosing the effect to add.
- Sharpen
- Glow
- Portrait
- Pencil
- Ink
- Oil
- Median
- Noise
Edit area commands
- Add: adds an effect to the Edit area.
- Remove: removes an effect from the list in the Edit area.
- Move up: moves up an effect in the list in the Edit area.
- Move down moves down an effect in the list in the Edit area.
2. Preview area
Shows a preview of the image that is being edited.
3. Edit area
When an Effect is selected it is added to the Edit area. A checkbox appears next to the effect's name. When it is enabled, you can change the parameters of the selected effect that will be applied on the image.
The effects are applied on the image by order in the list. This order can be modified by the Move up and Move down buttons, in the toolbar line.
 left click