Earth Scan
 left click
This command scans a terrain from the cloud and imports it as a textured mesh or a terrain object.
After running the laEarthScan command, the Import Earth's elevation data dialog will appear.
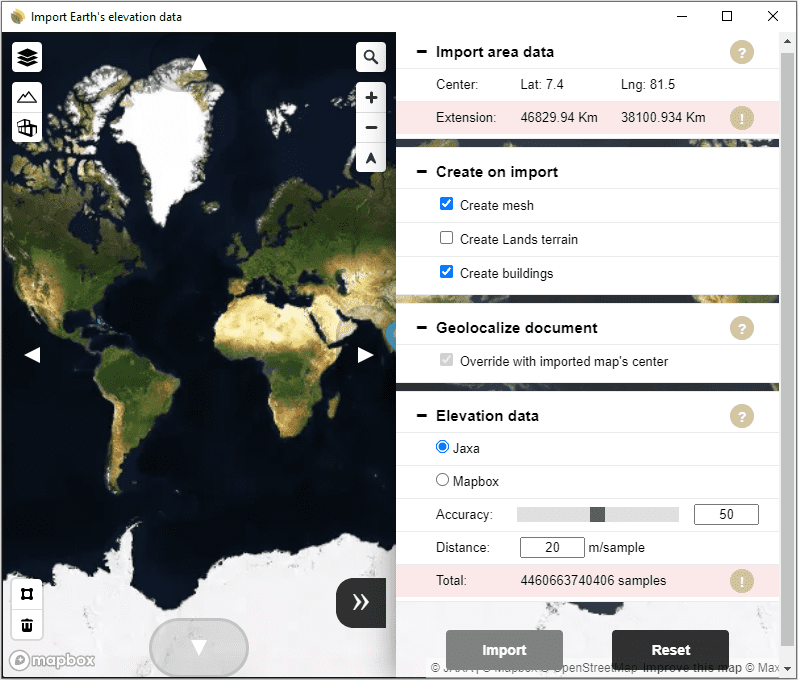
Import Earth's elevation data dialog
This dialog is divided into two parts. A navigation area over the Earth and the Import settings.
Navitation area
Map:
 Map modes: option to switch from different navigation maps: Streets, Outdoors, Satellite and Satellite Streets.
 3D terrain: option to enable the navigation with the terrain in 3D.
 3D buildings: option to display the buildings in 3D. (The buildings are not visibile when using the Satellite map mode).
Navigation controls:
 Search: use this field to find a specific location in the world
- Zoom buttons: use the + and - buttons to zoom in and out.
 North arrow: use this button to reset the bearing to North.
- Mouse controls:
- Left click pressed: pan zoom
- Middle scroll button: zoom in and out
- Right click pressed: orbit 3D
Import settings
The settings will define the data you want to import. They can be collapsed with the Arrow button at the bottom part of the settings.
Steps:
- Navigate over the Earth area you wish to import. The area behind the settings is also included. Use + and - buttons to zoom in and out, and the arrows to scroll the map exactly one frame next to the other at the same altitude.
- Define the area to import by clicking on the Frame button
 and defining the area on the map. Click on the Delete button
  to clear the selection and import the whole terrain displayed in the dialog. The area is limited to 10 Km extension along each side of the selected area, otherwise the elevation data can't be imported.
 - Select one of the Create on Import options:
- Create mesh: a textured mesh tagged as a terrain with the picture of the scanned area will be created.
- Create Lands terrain: a terrain will be automatically created with the scanned elevation data.
- Create buildings: a rough volumetry of the buildings included in the scanned area will be imported as meshes.
- Geolacalize document. In the first import, the center of the image will be located at the (0,0,0) document coordinates. It will correspond to the model's position in latitude, longitude, and elevation. In a second import, you can choose whether maintaining the document origin coordinates of the first import or overriding it with the new imported map's center.
- Choose the Elevation data:
- Data source: choose Jaxa if you need more precision, or Mapbox if you don't want bumpiness, specially in urban areas.
- Accuracy: select the accuracy of the samples to scan by a range of values (0-100) or by a specific distance among samples. The selected values will calculate the number of samples required in the import, which is limited to 50.000 per import.
- Click on the the Import button to import the selected data. (Click on the the Reset button to restart the initial settings).
Note 1The data provided from the cloud has an overall accuracy of nearly one sample every 30 meters. If you specify a smaller value in the Elevation data settings, Lands will generate the interpolated samples automatically.
Note 2If you choose the Create mesh option, once you import it, turn the Rendered Display mode on to see the image on the imported mesh.