Animation Panel
 left click
The Lands Animation panel is a dockable panel that lets you create, play and render animations throughout the project.
The animation is also useful to perform studies on the sun movement across the landscape, including simulating vegetation changes over the years or over the seasons.
The Lands Animation panel is divided in three areas:
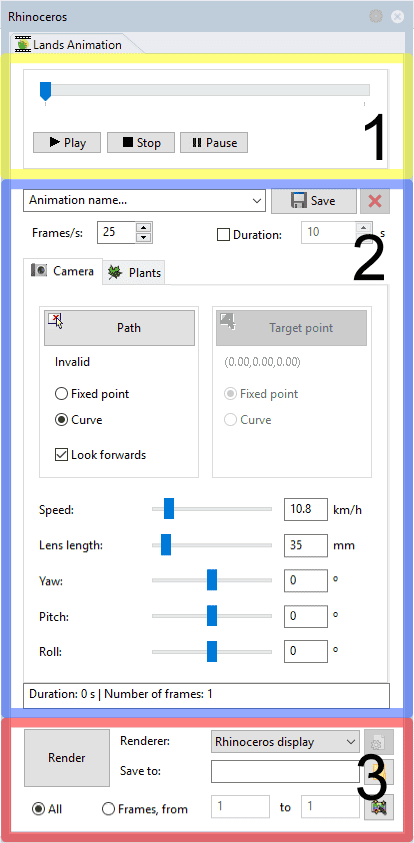
Lands Animation panel
1. Playback controls
The playback controls let you preview your animation before rendering it. The available features are those common for all media players: Play to start / resume the animation, Stop to stop and return to the beginning, and Pause to stop and freeze the image.
It is necessary to set a Camera path in order to enable the playback controls. The player will respect the display mode of the viewport.
2. Animation parameters
This area shows the animation parameters grouped in three different tabs, as well as the general animation settings.
General
- Save: enter a name to save the current parameters or select a previous one to restore it.
- Frame/s: it determines the number of images per second contained in the animation. The greater number of images, the greater the smoothness of the motion (but also the greater the time necessary to render the animation).
- Duration: it specifies the duration of the animation. If this box is unchecked, the duration is calculated automatically according to the Frame/s setting.
The combination of number of images per second and duration (expressed or calculated) will result in a specific number of images to render. The resulting number of images and the duration according to the values entered is displayed at the bottom of this area.
 Camera
- Position:
- Fixed point: the camera will stay in the same position during the animation. Click on the button above to select a point in the model.
- Curve: the camera will move along a curve that will define the animation path. Click on the button above to select a path in the model.
- Target:
- Fixed point: the camera will be looking at one fixed point during the entire animation. Click on the button above to select a target point in the model.
- Curve: the camera will be looking at one curve during the animation. Click on the button above to select a target path curve in the model.
- Look forwards: the camera will look always forwards along the path curve.
- Speed: it defines the speed in which the camera will move along the path, calculated in kilometres per hour. This parameter cannot be edited once the duration of the animation is expressly specified. In this case, Lands will calculate the speed of the camera needed to complete the path within the specified time duration.
- Lens length: it controls the camera aperture angle and it is specified in millimeters. The shorter the lens length, the greater the field of view. The greater the lens length, the lesser the field of view which would require a greater "zoom" of the target.
- Yaw, Pitch and Roll: it specifies the angles of the camera rotation along its Z, X and Y axis respectively. When choosing the Look forwards option, the user can freely modify the three angles since there is no existing camera target to force the view upon. However, when a camera target is specified, only the Roll can be applied, the only rotation that does not modify the direction of the camera target.
 Plant
Plant
This tab lets you apply a season change, plant growth and wind simulation during the animation.
- Enable season change: the animation will change the plant representation from one season to another.
- Enable plant growth: the sliders represent a percentage of the minimum and maximum height values of each especies. The animation will show the plants growing according to these percentages.
- Enable wind: it specifies the speed of the wind effect during the animation.
NoteThese effects are not visible during the preview of the animation or when recording a video using the Rhino display option.
3. Render settings
In this area you can save the rendered images of the animation and create a video from them.
- Render button: click this button to play and save the animation. Type a name for the animation in the General animation parameters and specify a folder for the rendered images.
- Renderer: choose between the current Rhino display mode you have in the viewport or the current render engine you have in Rhino.
- Save to: choose the folder where the rendered images and the video (in .avi format) will be saved.
- Frame range: select All to render the full animation, or select a specific range of frames.
 Image filter: this button launches the Image Filter application, from where you can add one or more filters to the video animation result.